An introduction of 3d Max

Before proceeding, let us define for whom this course of lessons. All lessons will be created for people who want to explore the three-dimensional modeling in this environment, but do not have the slightest experience of this very model, ie for beginners. Therefore, each of the lessons I try to write very detailed. But if you have any questions after reading, you can specify in the comments after the lesson.
Now let's talk about what you should be able to. The most important thing required of you - this is a great desire to learn something, without it just does not work. It is desirable to have an art education, or simply to be able to draw well by hand. I repeat: it is desirable but not required. This may help in some places, but if you have this strained, do not worry. Then, again, it is desirable to have a three-dimensional thinking to imagine that you modeliruesh, but if not, then I think, in time to appear. And finally, the last - is the general ability to handle the computer: stupid to be able to move the mouse around the screen and press the right buttons. But I think if you read these lines, there are no problems.
Now, about where we will learn 3ds Max. All the lessons I would write for 3ds Max 2009, but they are relevant to any version of Max since, perhaps, with 3ds Max 4. So, if you can not or do not want to set this environment, it is not necessary. If a tool is only available in 3ds Max 2009, I will write about it separately. We strongly recommend to put only the English version without any Russifiers. First, the different localization translate the menu items in different ways, it may be misunderstanding (you just can not find a menu item).Second, the localization, I have seen, translated, not all menu items, ie the use of them will not be much.Third, all the elements that will be used, I will call in English.
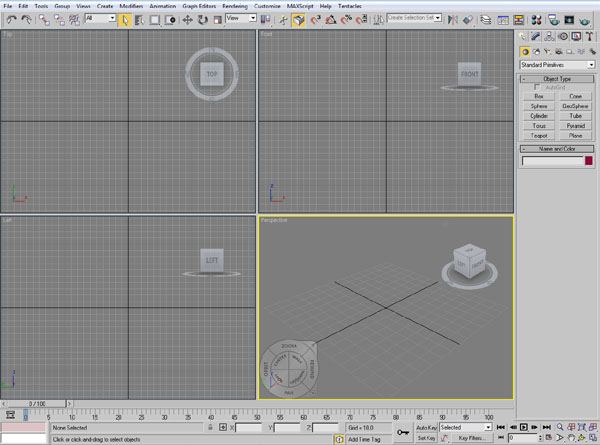
So, let us at last to the very lesson. Start 3ds max and see the main window, 4 gray rectangle in the middle - this is a working area, where and are the objects. All that out of these squares - these are different controls:
Let us examine the basic elements of management, if there is anything not clear, do not worry, the following lessons on many instruments, I explained.
Let's start with the upper left-hand menus:
The first element (Undo) cancels a perfect work, and the second (Redo), respectively, to the back undone, as in any office program:
Select and Link allows you to attach one object to another, so moving, you will move and the second object:
Unlink Selection, respectively, can break the link created by the previous instrument:
Select Object: the name itself, I think it is clear that the tool identifies the object you want:
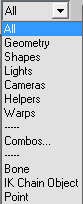
Selection Filter - with the help of this list, you can select objects of a certain type that you want to select. By default, this list is All, ie you can select all objects.
Select by Name - Each object in 3ds Max is given a name, sometimes when a lot of objects, it is convenient to allocate the object, without clicking on it (as is the case with the Select Object), and found his name in the list that appears when you click on the tool :
Before we talk about the next instrument, I would like to tell you about one little feature tools such as this. The fact that some buttons have a small black triangle in the lower right corner, like this:
This means that if you press and hold down the mouse button on these buttons, you will have a choice of several elements, something like a drop-down list. Just in time for such tools include Selection Region:
This tool allows you to choose the form of a framework that will appear when the group allocation. The default is a square frame.
Window / Crossing - to determine which objects will be allocated for group selection. In the case of «Window» identifies those objects, which fall into the secreting frame. In the case of «Crossing» stand out and the objects that intersect giving off the frame. The default setting is «Crossing»:
Select and Move - Allows you to select and drag an object
Select and Rotate - Allows you to select and rotate the object
Select and Scale - Allows you to select and scale the object
Mirror - Allows you to flip the selected object
Well, perhaps, all the basic elements of the menu, there is still, of course, left a lot of things, some of them we even come in handy in the future. But so far described, and quite enough.
Now consider the menu, which is located in the lower right corner:
I think that is a very important menu bar, as according to my observations on its points have to click more often, but first analyze the basic principles of the workspace.
As I said before, this is equal to four gray rectangles are, respectively, three types of the object (by default, top, front and left side) and one kind of perspective. This is most easily understood with an example, I create an object for this tea:
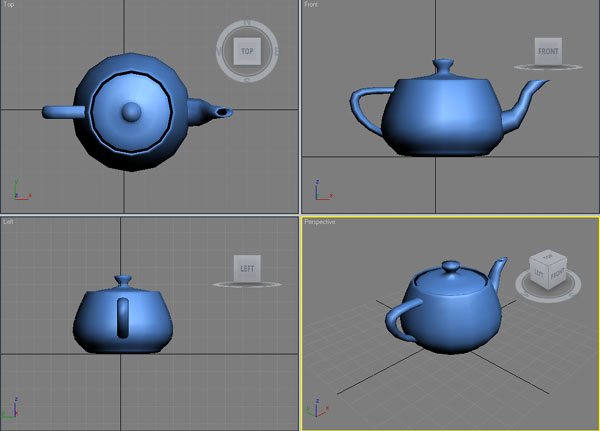
As is now evident in the upper left rectangle kettle presented above, in the upper right - the front, on the lower left - the left and on the bottom right - presented the prospect of a teapot. Note that, with the prospect of a rectangle outlined by a yellow border, which means that at the moment this kind of active, to change the active mode, you must click the right mouse button on the desired window (rectangle / mean).
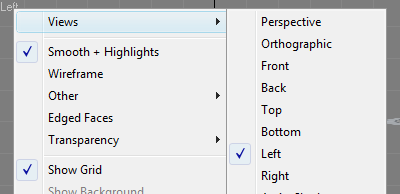
Presented species are not fixed and can be changed. To do this, right-click on the name of the form and the Views tab, select the desired form:
So, back to where we started, to the lower right menus. The first element of the menu - Zoom - as, perhaps, understandable by name - allows you to increase or decrease the size of the image in the active region:
To do this, select the tool, point to the active region, press the left mouse button and drag the mouse up or down, depending on what you want - zoom in or out.
Zoom All - doing the same thing as the previous instrument, but in all operating areas:
Zoom Extents - automatically increases or decreases the scale so as to display all objects in the active work area:
Zoom Extents All - similar to the previous tool, just makes it all work areas.
Pan View - allows you to drag and drop form in the plane of the screen
Orbit - as it allows you to rotate the camera around the object:
Use this tool only in perspective, if we apply this tool to, say, as above, then this kind of get off on the orthographic, and this is not the best kind of modeling, and will have to change it back, in general, take a rule to use this tool only species in the future.
Now, how to use it. After pressing this button in the workspace you see a yellow circle with four squares:
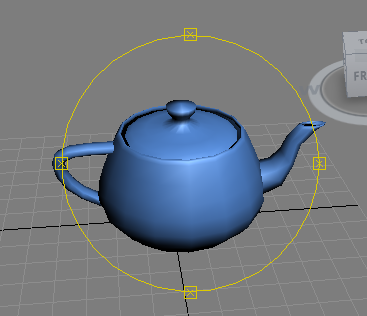
Rotation by tightening the left mouse button and moving the mouse around the screen, with pay attention to the cursor before pressing it indicates the axis / axis of rotation. Outside the yellow circle is the axis of rotation perpendicular to the screen as it were. If the cursor is in a yellow circle, there will be two axes of rotation: one directed upwards parallel to the plane of the screen, and the second - from left to right and parallel to the plane of the screen. When you hover over one of the yellow squares selected one of these two axes.
Maximize Viewport Toggle - allows you to deploy the active work area, full screen, or, respectively, to turn

If you like that kind of changed and you did not like it and have all of it back, then press the main menu View-> Undo View Change.
Now, one very useful feature that will save time not only when working with this navigation menu, but in general, wherever the left mouse button is pressed and the mouse is dragged sideways. Whether it's a zoom, rotate, drag and drop or create the object is not important. The idea is that if, after you have squeezed the left mouse button and drag it started and the result is you just do not like, do not throw it and cancel the action in the appropriate menu. It should be holding, the left mouse button, press the right button, and committed action canceled. Try a couple of times to do this and remember this action in the future, bring it to automatic.
Now a quick look at the menu, which lets you create and edit different objects. Briefly, because the more it will be considered in all other classes, in fact, most of all lessons will be structured around this menu:
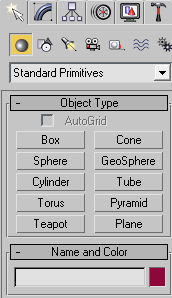
On top there are different tabs, we still are only interested in the first two.
Create - to create different objects
Modify - change of already created objects
On the Create tab, there are different types of objects that can be created
Under this menu there are subtypes of Object drop-down list
In this case, select the type of Geometry (Geometry) and subtype Standard Primitives (standard primitives).Then there are the objects created by themselves in the form of buttons:
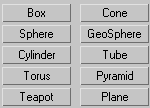
To create an object, you must click on one of these buttons, then press the button in the active region and, depending on the object, leaving it jammed, and stretch or just let it go.
For example, analyze the object creation Box (cube).
- Click on the button «Box»;
- Moving the mouse on the workspace perspective (preferably before you deploy it to full screen with the tool Maximize Viewport Toggle);
- Press and hold the left mouse button, leading it to the side. Begins to form the "bottom" of the future dice;
- When the bottom is finished, release the left mouse button and drag the mouse up, forming a cube height;
- When a cube is finished, press again the left mouse button to fix the result.
Once again I draw your attention to the fact that at any stage of a cube, you can press the right mouse button and undo everything that has been created.
Similarly create other objects, try to create something else.
Well, actually, and all I wanted to tell at this first introductory lesson, any questions or suggestions please contact us in the comments.
No comments:
Post a Comment